Spider Plant Care and Propagation

Jose Brito
I’m Jose Britto, the writer behind The Country Store Farm Website. I share practical, down-to-earth gardening advice for home growers—whether you’re starting your first raised bed, troubleshooting pests, improving soil, or figuring out what to plant next. My focus is simple: clear tips you can actually use, realistic expectations, and methods that work in real backyards (not just in perfect conditions). If you like straightforward guidance and learning as you go, you’re in the right place.
Spider plants (Chlorophytum comosum) are popular for one big reason: they bounce back. They handle a missed watering, they grow in average indoor light, and when they are happy they send out long stems covered in little “babies” you can root into new plants.
This guide covers the basics that keep them looking good, plus the common issues that make leaves go pale, yellow, or crispy at the tips.

Quick care checklist
- Light: Bright, indirect light is best. Tolerates medium light.
- Water: Water when the top 1 to 2 inches of soil feels dry.
- Soil: Regular indoor potting mix with good drainage.
- Humidity: Average home humidity is fine, but dry air can worsen brown tips.
- Temperature: Best around 65 to 80°F. Avoid cold drafts and try not to let it drop below ~55°F.
- Fertilizer: Light feeding in spring and summer, not heavy.
Fast troubleshooting
- Brown tips: Usually inconsistent watering, salt buildup, hard water, or very dry air.
- Yellow leaves + wet soil: Often overwatering or poor drainage.
- Yellow leaves + dry soil: Underwatering or a plant that dries too fast (root-bound, too much sun, small pot).
- Pale, stretched growth: Not enough light.
Light: where spider plants grow best indoors
If you want a full plant with crisp striping and lots of babies, aim for bright, indirect light. Think near an east window, a few feet back from a south or west window, or filtered light through a sheer curtain.
What happens in too much sun
Harsh direct sun can fade the leaves and scorch the tips, especially on variegated types. If you see bleached patches or crispy areas on the side facing the window, pull it back or add a light curtain.
What happens in low light
Spider plants survive low light, but they slow down. You may see longer, softer leaves, less striping, and fewer spiderettes. If your plant looks “okay but not great,” light is usually the easiest upgrade.

Watering: the routine that prevents most problems
The goal is simple: water thoroughly, then let the soil dry slightly. Spider plants hate sitting in soggy soil, but they also look rough if they stay dry too long.
When to water
- Stick a finger into the pot. If the top 1 to 2 inches are dry, it is time to water.
- If the pot feels very light when you lift it, it is usually ready.
- In winter, water less often because growth slows and evaporation drops.
How to water correctly
- Water thoroughly until you see water drain out of the bottom.
- Empty the saucer after 10 to 15 minutes so the roots are not soaking.
- Use a pot with a drainage hole. Strongly recommended for consistent success.
Brown tips: why they happen and how to fix them
Brown tips are the most common complaint with spider plants. The good news: once a tip turns brown, it does not turn green again. The goal is stopping new tips from browning.
Most common causes
- Inconsistent watering: Letting the plant get very dry, then soaking it, can trigger tip burn.
- Salt and mineral buildup: Hard water, fertilizer salts, and high dissolved minerals can contribute over time. (Fluoride is often blamed too, but overall salt buildup is the more consistent culprit.)
- Water softeners: Softened water often contains added sodium, which can be rough on leaf tips.
- Very dry air: Heaters and winter air can make tips crisp faster.
- Too much direct sun: Especially if the plant is right in a hot window.
Practical fixes that actually help
- Switch water: If you have persistent brown tips, try filtered, distilled, or rainwater for a month or two.
- Flush the soil: Every 2 to 3 months, or a few times during the growing season, water heavily so extra salts wash out the drainage hole. Let it drain fully and do not leave it sitting in runoff.
- Fertilize lighter: Use half-strength houseplant fertilizer during active growth.
- Trim for looks: Snip brown tips with clean scissors, following the natural leaf shape.
- Raise humidity a bit: Grouping plants can help a little. Pebble trays may help slightly right around the plant, but a small humidifier is more effective in very dry homes.

Yellow or pale leaves: what your plant is telling you
Yellowing can mean very different things depending on what the soil feels like and where the plant sits. Use the pattern to narrow it down.
Overwatering (very common)
If the soil stays wet for days and lower leaves turn yellow, suspect overwatering or poor drainage. Let the soil dry more between waterings, and make sure the pot drains freely. If the potting mix is old and stays soggy, repot into fresh mix.
Underwatering (also common)
If the soil is dry and leaves yellow, curl, or look limp, the plant is likely staying dry too long. Water thoroughly, then aim for a steadier rhythm. If it dries out in a day or two, it may be root-bound or in a very small pot.
Not enough light
If the whole plant looks washed out or limp and growth is slow, it may be too dim. Move it closer to a window or add a grow light for 8 to 10 hours a day.
Too much fertilizer
Heavy feeding can lead to leaf discoloration and burned tips. Back off fertilizer and flush the soil.
Nutrient depletion in a crowded pot
Spider plants can live root-bound, but after a while they run out of fresh soil and nutrients. If you see lots of roots and thick, pale growth, it is time to repot or top-dress.
Soil and pots: keep it simple, keep it draining
A spider plant does well in a basic indoor potting mix. The key is drainage and air. If your mix feels heavy or stays wet too long, cut it with perlite or orchid bark.
- Good mix: Standard potting soil + 20 to 30% perlite.
- Pot choice: Plastic holds moisture longer, terracotta dries faster. Choose based on how often you tend to overwater or underwater.
- Drainage hole: Required.
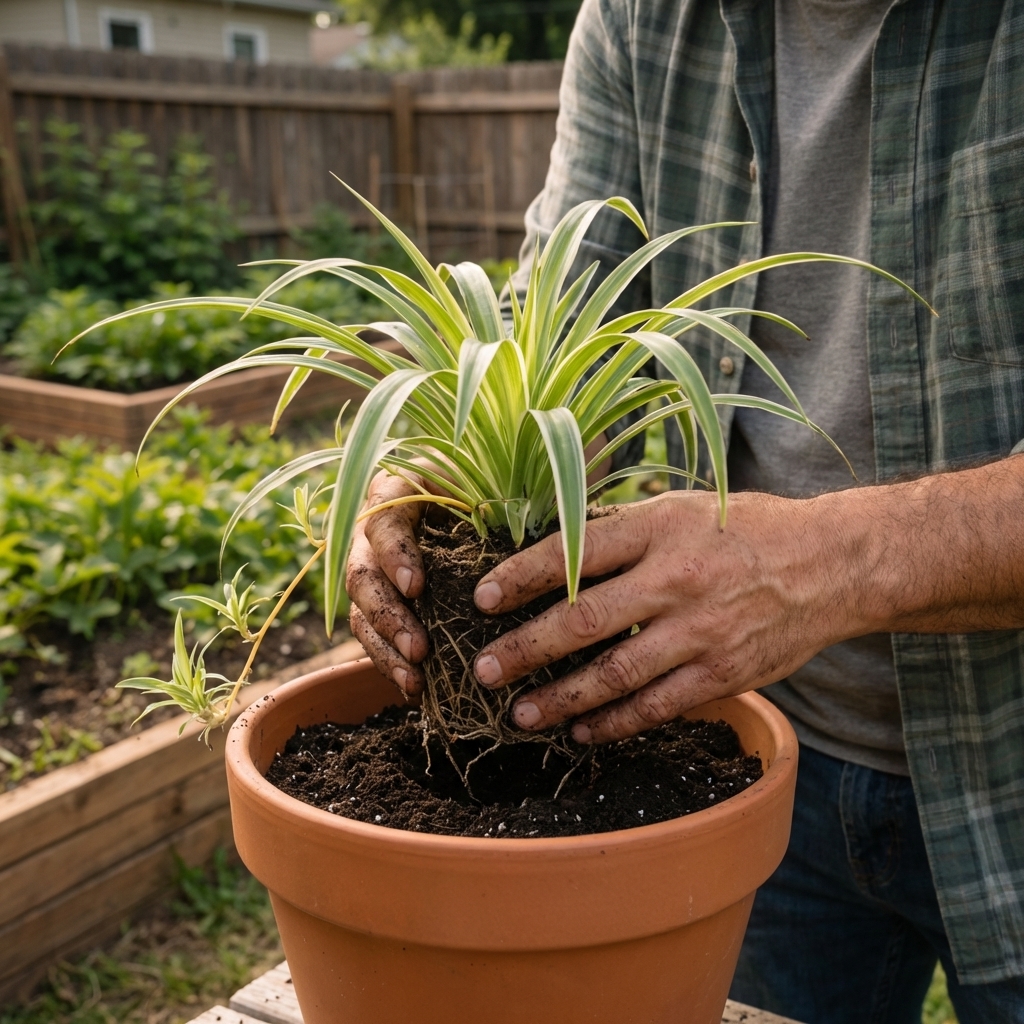
Repotting: when to do it and how
Spider plants often like being a little snug, but there is a point where “snug” becomes “struggling.” If roots are circling tightly, poking out of the drainage hole, or the plant dries out in a day or two, repotting helps.
Best time to repot
Spring through early summer is ideal, but healthy spider plants can handle repotting any time if needed.
Step-by-step repot
- Choose a pot 1 to 2 inches wider than the current pot.
- Water the plant the day before to reduce stress.
- Slide it out, loosen the outer roots gently, and remove any mushy roots.
- Set it at the same soil level as before and fill around with fresh mix.
- Water in, then let the top inch dry before watering again.
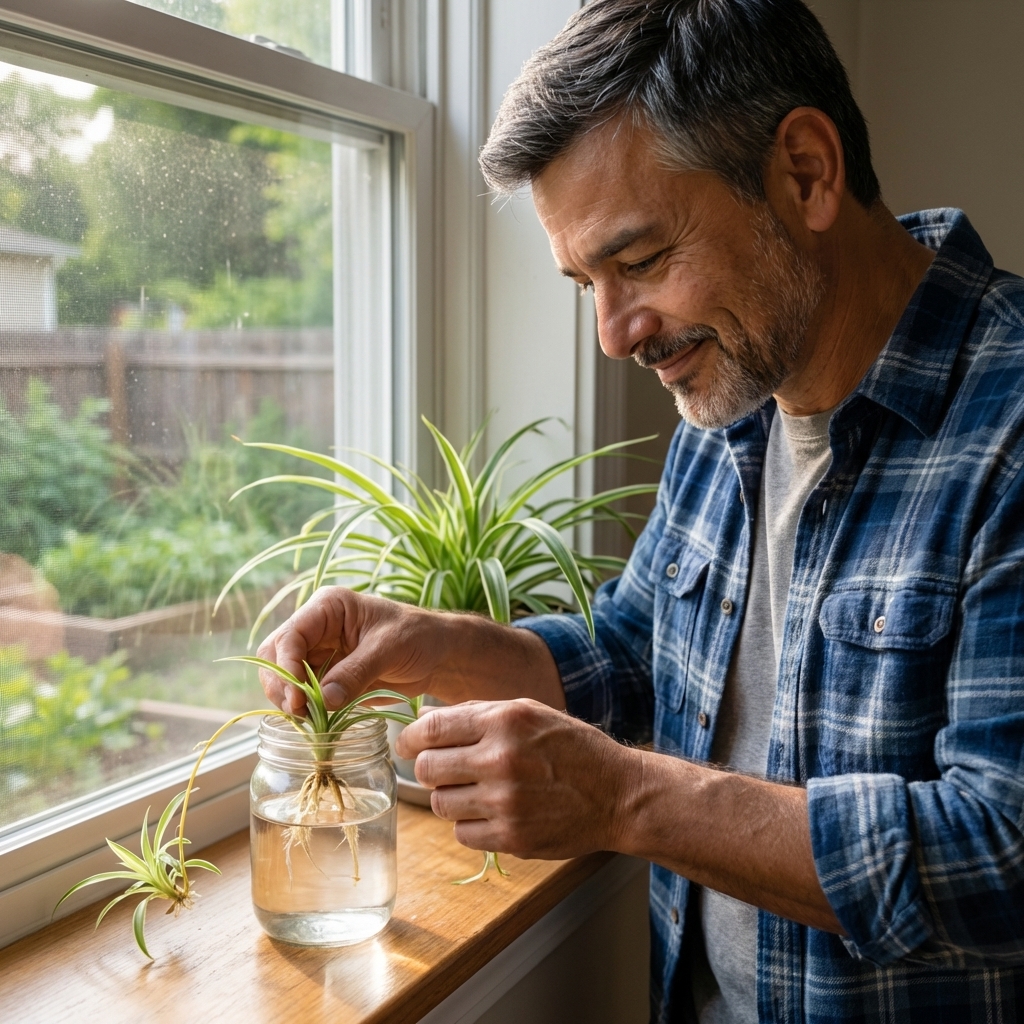
Propagation: how to root spider plant babies
Those dangling babies are the easiest propagation win in houseplants. Each spiderette is basically a starter plant with its own little root nubs.
When a spiderette is ready
- It has a small rosette of leaves and visible root bumps.
- It looks firm and grown-up, not tiny and soft.
Method 1: Root in water
- Snip the spiderette from the runner with clean scissors.
- Place the base in a small jar of water. Keep the leaves above the waterline.
- Change water every few days.
- When roots are a couple inches long, pot it into soil and keep slightly moist for the first week.
Method 2: Root in soil while attached
- Set a small pot of moist mix next to the mother plant.
- Pin the spiderette base onto the soil surface using a bent paperclip or small piece of wire.
- After 2 to 4 weeks, tug gently. If it resists, it has rooted.
- Cut the runner and treat it like a normal plant.
Method 3: Divide the main plant
If your spider plant is huge and packed with multiple clumps, you can divide it during repotting. Pull sections apart gently, making sure each division has roots, then pot them separately.
How to encourage more babies
If you want lots of spiderettes, think like the plant. Babies are a sign the plant has enough energy and is mature enough to reproduce. You will often see small white flowers first, then runners.
- Give brighter indirect light: This is the biggest factor indoors.
- Keep it slightly root-bound: A pot that is too large can delay flowering and runners.
- Feed lightly in spring and summer: Too much fertilizer can burn tips, but a small amount supports growth.
- Do not overwater: Constantly wet roots reduce vigor.
- Be patient: Younger plants may need a season or two before they start throwing runners.
Pruning and cleaning
- Remove fully brown leaves: Cut them at the base with clean scissors.
- Trim scorched sections: If a leaf is badly sunburned, it is fine to remove the whole leaf so new growth can take over.
- Wipe dust: A quick wipe with a damp cloth helps the plant photosynthesize better, especially in bright light.
Common pests (and what to do)
Spider plants are usually tough, but indoor pests can still show up.
- Spider mites: Fine webbing, speckled leaves. Rinse the plant well and treat with insecticidal soap, repeating weekly.
- Mealybugs: White cottony clusters in leaf joints. Dab with rubbing alcohol on a cotton swab, then follow with soap spray.
- Scale: Small brown bumps on stems and leaves. Scrape gently and treat as above.
Any time you spot pests, isolate the plant for a couple weeks so they do not spread.
Are spider plants safe for pets?
Spider plants are generally considered non-toxic to cats and dogs, but they can still cause mild stomach upset if a pet chews a lot of leaves. Cats also tend to find spider plants oddly irresistible (some people describe a mild “catnip-like” attraction), so place the plant up high if your cat treats it like a salad bar.
FAQ
Should I cut off the long runners?
You can. Runners do not usually harm the plant, but trimming them can tidy the look and push energy back into leaf growth. If you want babies, leave them until you propagate.
Why is my spider plant floppy?
Most often it is either too dry or too dark. Check soil moisture first, then adjust light.
Can spider plants live in water long-term?
They can survive for a while, but long-term growth is better in soil. Root in water, then pot up for best results.
Bottom line
If you nail two things, you will have a great spider plant: bright indirect light and watering only after the top of the soil dries. From there, brown tips are usually a water quality or salt buildup issue, and babies are a sign you are doing most things right.