How to Get Rid of Weevils in Your Pantry

Jose Brito
I’m Jose Britto, the writer behind The Country Store Farm Website. I share practical, down-to-earth gardening advice for home growers—whether you’re starting your first raised bed, troubleshooting pests, improving soil, or figuring out what to plant next. My focus is simple: clear tips you can actually use, realistic expectations, and methods that work in real backyards (not just in perfect conditions). If you like straightforward guidance and learning as you go, you’re in the right place.
Finding little brown bugs in your rice or flour is one of those moments that makes you want to throw out half the pantry and start over. The good news is pantry weevils and their look-alikes are manageable. You do not need harsh chemicals. You need a thorough reset and a better storage routine so they cannot keep cycling through your food.
In this guide I will help you identify common pantry pests, explain how they get into your kitchen, and walk you through a step-by-step cleanup that actually works in real homes.

What pantry weevils look like
Most pantry infestations come from a small group of common grain pests. People often call them “weevils,” but you may be dealing with true weevils (with a noticeable snout) or other pantry beetles that look similar at a glance.
Common culprits include: rice or maize weevils, granary weevils, red or confused flour beetles, and sawtoothed grain beetles.
Rice and grain weevils
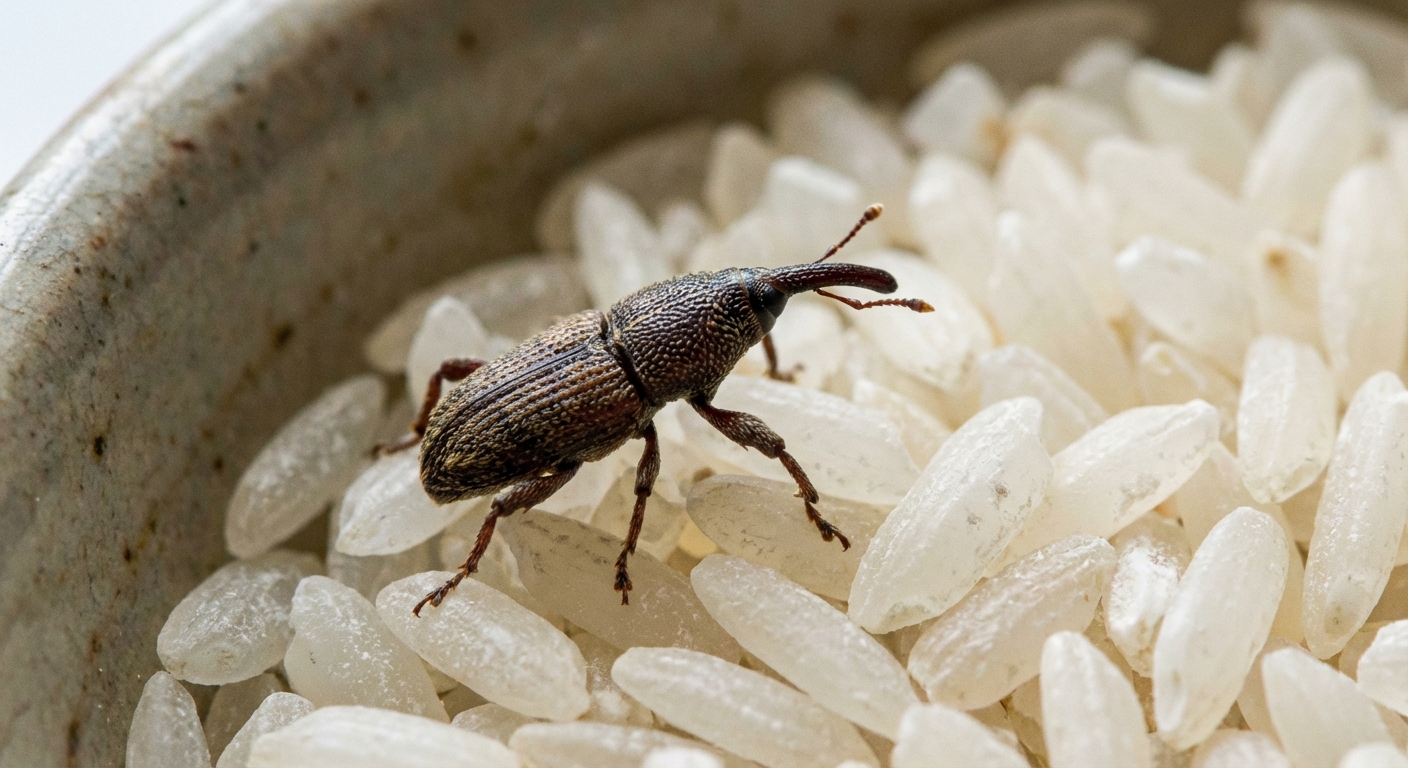
These are common in rice, wheat, corn, and other whole grains. Adult weevils are small, often around 1/8 inch (about 2 to 4 mm) long, depending on species. They are reddish-brown to dark brown and usually have a distinct snout. Rice weevils may show faint lighter spots on their wing covers.
- Where you see them: rice, whole grains, pasta, popcorn kernels, bird seed
- Big clue: you may find neat little round exit holes in grains because larvae develop inside the kernel
Flour beetles and other pantry beetles
In flour, baking mixes, and processed grain products, you may find weevils, but you also commonly find flour beetles (and sometimes sawtoothed grain beetles). Either way, the cleanup is basically the same: remove the source, clean, and switch to sealed storage.
- Where you see them: flour, pancake mix, cake mix, breadcrumbs, cereal, crackers, spices
- Big clue: very fine “dust,” clumping, and small crawling beetles near seams of packages
How they get into your pantry
This part surprises people: many pantry pests do not march in from outside. They often arrive in food you bought. Eggs or tiny larvae can be inside whole grains, or pests can be introduced during processing, packaging, transport, or storage.
Common ways they hitch a ride:
- Store-bought dry goods: rice, flour, pasta, cereal, beans, and baking mixes
- Bulk bins: shared scoops and bins make it easy for pests to spread
- Pet food and bird seed: frequent sources, especially in garages and mudrooms
- Old cardboard packaging: pests love folds, glue lines, and easy entry points
Once they are in, they spread by crawling from package to package and laying eggs. Warm kitchens speed up the life cycle, which is why infestations can seem to “explode” within a couple of weeks.
Weevils or pantry moths?
If you have dealt with pantry moths before, here is the quick separator:
- Weevils and pantry beetles: small crawling beetles, no webbing, often found inside rice and grains
- Pantry moths: flying moths, you will see webbing or clumps in food and in corners of packages
It is possible to have both at the same time, especially if your pantry has a lot of open bags and boxes.
Is the food safe?
This is the practical, hygiene-first answer: if a product is heavily infested, smells off, is clumped, or has obvious frass (bug dust), discard it. If you are unsure, it is usually better to toss it than to gamble.
For lightly affected items, some people sift, rinse, and cook (especially with whole grains). That is a personal call, but do not serve questionable food to anyone with allergies, respiratory sensitivities, or a compromised immune system. When in doubt, throw it out.
Step-by-step: get rid of pantry weevils
If you want them gone for good, the goal is simple: remove infested food, kill hidden stages (eggs and larvae), and eliminate crumbs and hiding places so nothing survives to restart the problem.
Step 1: Pull everything out and sort it
Empty the pantry shelf by shelf. Do not do “a quick scan.” Put items on the counter so you can actually inspect them.
Check these high-risk foods especially closely:
- Rice, flour, cornmeal, oats
- Pasta and boxed mixes
- Dried beans and lentils
- Nuts, seeds, dried fruit
- Spices and herbal teas
- Pet food, treats, bird seed
- Less obvious sources: decorative corn, holiday nut mixes, craft grains, and pet food bins
What to look for: live beetles, small tan larvae, powdery buildup, clumping, and tiny holes in grains. If you see activity, assume that package is compromised.
Quick safety note: keep infested items off food-prep surfaces when you can, wash hands after handling, and avoid spraying insecticides in areas where food is stored or prepared.
Step 2: Bag and remove the worst offenders
If a package is clearly infested, the most realistic move is to throw it out. Seal it in a trash bag before it goes through your kitchen so adults cannot drop off along the way.
If you are on the fence, do the “tap test”: tap the package over the sink or a white plate. If you see little specks moving, do not keep it.
Step 3: Treat foods you keep (freezing)
Freezing is one of the best tools for pantry pests because it can kill eggs and larvae you cannot see yet.
- Best practice: seal the food in a freezer bag or airtight container.
- Freeze at: 0°F (-18°C) if possible.
- Freeze for: at least 4 days at 0°F (-18°C). For extra margin, full freezers that warm up, or frequent door-opening, use 7 days.
- After freezing: let it come back to room temperature while still sealed to reduce condensation.
Once it is treated, move it into airtight storage so it stays protected.
Optional: heat treatment (faster for some foods)
If freezer space is tight, gentle heat can also work for some dry goods, with a tradeoff in quality (it can change texture, freshness, or flavor).
- Basic approach: spread dry goods in a thin layer on a baking sheet and heat at about 130°F (54°C) for 30 minutes.
- Use caution: ovens vary, and hotter temps can toast or damage foods. Skip heat treatment for anything that might melt, scorch, or spoil.
If you are not confident you can hold a low, steady temperature, freezing is the safer option.
Step 4: Deep clean the pantry
This is the step that makes or breaks the job. Weevils and other pantry pests can hide in cracks, shelf pin holes, and the folds of shelf liners.
- Vacuum first: use a crevice tool along shelf edges, corners, and any holes. Vacuum the wall and baseboards around the pantry too.
- Remove liners: if you use shelf liner paper, pull it up and replace it, especially if you see dust, eggs, or bugs underneath.
- Wash surfaces: wipe shelves with hot soapy water. A little white vinegar in rinse water is fine, but soap and elbow grease matter most.
- Skip strong pesticides: you are cleaning a food storage area. Physical removal and sealed storage beat spraying.
- Dispose of vacuum contents: empty the vacuum canister or bag outside immediately.

Do bay leaves help?
Bay leaves are a common old-school deterrent. Here is the honest take: bay leaves are not a cure. Results are inconsistent, but they can be a helpful layer of prevention once you have cleaned and switched to airtight containers.
If you want to try them:
- Place a bay leaf or two in the corners of pantry shelves or inside a canister cabinet.
- Replace them every 1 to 2 months, or sooner if they lose their scent.
- Do not rely on bay leaves to protect food that is still in thin plastic bags or cardboard boxes.
Think of bay leaves as a small assist, not the main strategy.
Best containers to prevent a comeback
Most comebacks happen because food goes right back into the pantry in the same easy-to-enter packaging. Cardboard and thin plastic are not barriers. Tight, sealed containers are.
What works well
- Glass jars with gasket lids (great for flour, rice, oats, pasta)
- Food-grade plastic containers with tight seals (good for big bags of rice or pet food)
- Thick freezer bags for overflow storage or short-term use
Extra tip that saves headaches
Date your dry goods with a marker on masking tape. Then use the older stuff first. The longer grains sit, the more time any missed eggs have to develop.

How long until they are gone?
If you remove infested food, treat what you keep, and deep clean, you usually see a major drop immediately. But do not stop paying attention too soon. Monitor for at least 4 weeks, and up to 8 weeks in warm homes or if the infestation was heavy.
During that time:
- Keep dry goods sealed in airtight containers.
- Wipe shelves weekly and vacuum crumbs as needed.
- Check around pet food, bird seed, and rarely used baking supplies.
When to call a pro
Most pantry weevil problems are DIY-able. Consider professional help if:
- You see insects spreading beyond the pantry into multiple rooms despite repeated cleanouts.
- You have a large grain or seed storage area (garage, basement, shed) that stays warm.
- You suspect rodents are getting into stored food and scattering it, creating ongoing attractants.
Even then, an exterminator will still tell you the same core truth: sanitation and sealed storage are the long-term fix.
Quick checklist
- Empty pantry and inspect everything.
- Toss obviously infested packages in sealed bags.
- Freeze keepers at 0°F (-18°C) for at least 4 days (or 7 days for extra margin).
- Vacuum cracks and holes, remove and replace shelf liners, then wash shelves with hot soapy water.
- Move dry goods into airtight containers.
- Optional: add bay leaves as a deterrent, not a cure.
- Monitor for at least 4 weeks (up to 8 if needed) and stay strict with storage.
If you do those steps in order, you will break the cycle and stop the next generation before it starts.